Carnivorous plants are a fun way to brighten up your home with something a little more interesting than your typical houseplant. Sundews are just one of the many different varieties of carnivorous plant you can choose from and they make a wonderful addition to any home. There are a remarkable number of species to fit every preference imaginable.
How long does it take to grow sundews? The germination process of sundew seeds varies depending on the species you are growing. Many common sundews will germinate within a few weeks, while the more difficult winter versions can take up to 3 years. Once the seeds are germinated, you will start to see the growth of carnivorous leaves within a month.
The timeline for growing sundews looks something like this:
- Mix up your potting material.
- Sprinkle your sundew seeds over the surface of the soil.
- Germinate your sundew seeds.
- Harden your seedlings. (optional)
- Feed your sundews as they grow.
If you are interested in the process of growing sundews, continue reading below to take an in-depth look at the entire timeline from start to finish. You may find that growing sundews is something you want to give a try!
What Is a Sundew?
Sundews, or Droseras, are a type of carnivorous plant that is found in many different places around the world. There are over 150 unique species of sundew. Some species of sundew feature flowers while others do not.
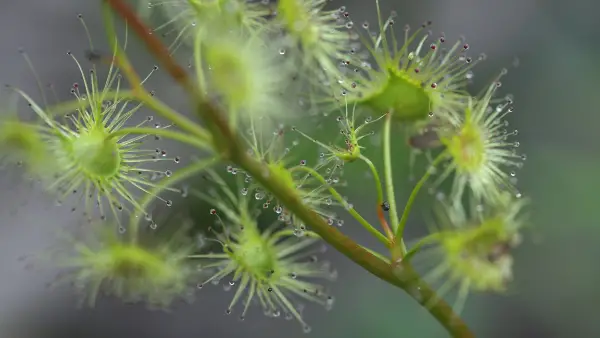
All sundews have leaves with small hairs growing from them. These leaves act as tentacles to engulf their prey and absorb the nutrients they provide. On the ends of the hairs is a sticky dew that traps insects so that they can wrap their leaves around them and dissolve them.
Each species of sundew has different needs and requirements for growing. There are some that require colder temperatures and many that need to spend a period of the year in dormancy. Most all sundews grow best with a lot of sunlight. It’s important to research your exact species of sundew to find out any unique needs it may have to survive.
How Long Does It Take a Sundew to Grow?
The growing time for sundews differs from species to species. Some sundews can germinate rather quickly, requiring only a few weeks, while others take as long as 3 years to even germinate. Most species of sundew will grow to maturity within a year if properly taken care of and fed.
Tropical and subtropical sundews are usually the easiest to grow and can come to maturity the fastest. Temperate sundews are grown in pretty much the same way, but they must go through a period known as cold stratification first. By far the hardest sundews to grow are tuberous sundews, which take the longest to grow.
Growing Sundews Indoors vs Outdoors
Sundews may be grown indoors or outdoors. You can also germinate the seeds indoors and then transplant the sundews outdoors if you believe they will be strong enough to survive. As long as you take good care of them and feed them well, there should be no issues.
Before deciding to plant your sundews outside, you should find out your climate zone. Look up information about the growing zone you live in and match it as best you can to a type of sundew. There are sundews that can survive every kind of climate found in the United States, it’s just a matter of research.
Preparing to Grow Sundews
Sundews tend to be a little bit picky about what is put in their pots while they are growing. They don’t do well with normal soil or tap water and these things will harm the germination process. For these divas, you have to be careful with what you choose to give them the best chance to grow and thrive.
Potting Materials
Regular potting soil contains too much nitrogen, which will kill your sundews. There are a lot of different mixtures you can use instead made up of different materials that are wonderful for sundews. You can use one type of potting material or create a ratio of a few different kinds, whatever suits your preference.
Common Sundew Growing Materials:
- Peat Moss
- Long-Fibered Sphagnum Moss
- Silica Sand
Peat Moss is the most commonly used material for growing sundews. It is common and easy to find at a garden center or hardware store. It’s essential to rinse any peat moss you buy before use to help prevent algae growth. You should also be careful not to inhale the dust and wear gloves if you might have any open wounds on your hands.
Long-Fibered Sphagnum Moss (LFS) is fantastic to substitute for peat moss. You can usually find it at your local garden center. LFS tends to be easier to use than peat moss in some instances and makes for cleaner material, though you should rinse it before planting your seeds just to be on the safe side.
Silica Sand is easy to track down if you look for the kind of sand used in pool filters. You should find sand that is at least .5 mm in size. Rinsing your sand is always a good idea, even if it’s already been washed. Playground sand isn’t a good substitute for silica sand as it doesn’t aerate the soil quite the same.
If you are looking for a ratio of materials to begin with, a 1:1 mixture of either peat moss or long-fibered sphagnum moss to silica sand is generally a good place to start. There are more complicated mixtures featuring even more materials, but these basic few will be the main ones you use.
Sundew Pots
To grow sundews, you will need a pot made of either ceramic or plastic to plant them in. The pot should be at least 3 inches tall, though some species require taller pots. If your species of sundew has longer roots, you may need to upgrade to a 4-inch pot or even a 6-inch pot.
Clay pots can be hazardous to your sundews over time and should be avoided. If you are on a budget, something like a plastic cup or a recycled container can grow most species of sundew perfectly well.
Growing Lights
Sundews need a lot of sunlight to grow, and often it’s best to supplement natural light with something strong and artificial. If you don’t have a particularly bright windowsill or find your house doesn’t get enough sun throughout the year, you may find a growing light to be your saving grace.
The best kind of growing light for sundews is fluorescent lights. You can use regular long fluorescent bulbs to shine light on your sundews, there’s no need for anything fancy or made specifically for plants. You should go with a variety of colors to cover the natural spectrum of light a sundew would receive from the sun.
You should keep your sundews as close as possible to your growing lights without burning them. The warmer your sundews are, the cozier they will get, and the faster they will germinate and start growing. You can even vary this during the year, getting them up close in the winter and further away in the summer when it’s hot.
Setting up a Tray
Using a tray to keep your sundews wet isn’t necessary. You can always simply water your sundews over the top whenever the soil begins to dry out. However, placing a tray of water beneath your pots is a great way to have your watering done for you for a time before you have to refill it. Even so, you should water your sundews the traditional way at least once every couple of months to rinse the soil.
The best sort of tray to use for sundews is a large plastic container, like what you might buy to keep shoes in. You can find them in all different dimensions depending on your planting needs. You will need to research your particular species of sundew to see if it likes to have a lot of water or not so much to grow.
The trays work utilizing evaporation. As the water evaporates under the sun or growing lights, it will be carried up through the pots and the soil to keep it moist. This process makes it especially important to rinse your potting materials to prevent excess build-up of minerals on the surface. This is also why you should water from the top every few months.
When you use trays, you will have to refill them with water once or twice a week, depending on conditions and how quickly the water evaporates. You can wait until the tray is dry before refilling it, as long as you know your sundews are getting a steady stream of water.
Watering Your Sundews
Sundews can’t grow if you give them only tap water. The minerals found in most tap water is extremely harmful to them and will only end up killing them before they get a chance to grow. You should always use purified water for your sundews to keep them strong and healthy.
Filtered water is a great option for sundews to get them that purity they require. You can also purchase reverse osmosis water if you want to go the safest route. Distilled water is another choice, though it can get a little expensive.
If you are growing your sundews outdoors, it’s perfectly fine to allow them to be watered by rainwater. You can collect it from your gutter runoff or a collection source if it doesn’t rain enough to keep your sundews properly watered.
Feeding Your Sundews
Feeding is perhaps one of the most crucial parts of growing a sundew. The nutrients the carnivorous plant receives from live prey helps it grow much faster and healthier. They won’t need to be fed until they start to grow their carnivorous leaves, but you should keep some nutritious snacks on hand for them once they do.
Some good options to feed sundews, aside from your normal household pests that they may catch, are freeze-dried blood worms, flightless fruit flies, and betta fish pellets. These will each provide your sundew with a nutritious meal to keep them happy and healthy. There are also some other options that provide the nutrients your plant needs, if you don’t want to be handling bugs.
Sundew Growing Timeline
When it comes to growing the simpler varieties of sundew (see the list for the best sundews for beginners below) you can follow this timeline. If you are giving yourself the challenge to germinate and grow a winter-growing type of sundew, such as tuberous, you will have to follow a different sort of process.
Prepare Your Soil
To begin, you should get your soil ready for all your pots. It’s perfectly fine to plant multiple seeds in the same pot for a better chance of germination, you don’t have to go overboard on the number. Make sure you rinse your potting materials thoroughly before placing it in your pots to get it nice and clean.
Don’t pack the soil in your pot too densely, as this can cut off airflow throughout the soil and deprive the roots of what they need to feed the plant. You can pack the soil at the very bottom of the pot, about the first half-inch, to help keep it moist at the top.
If you are planting your sundews outdoors, it’s still crucial to prepare the soil in a particular fashion. When planting them in the ground, till the soil you’ll be putting them as thoroughly as possible. Mix your preference of peat moss or long-fibered sphagnum moss into the soil to even out the acidity and make it a good home for your new plants.
Plant Your Seeds
You should always sprinkle your sundew seeds across the surface of the soil rather than burying them deep in it. If you bury your sundew seeds, they won’t be able to grow. They can be stubborn about leaving your fingers unless your hands are incredibly dry, so take your time when putting them in the pots.
For the best results, you should try to spread your seeds around the pot. Keep them around a centimeter apart if you want them to grow larger. Clumps of seeds may result in smaller plants that are fighting for space. You can always separate them after sprinkling if you can even see them.
Germinating Your Sundew Seeds – Normal
Warmth and humidity are two of the biggest factors in successfully germinating sundew seeds. Tropical and subtropical species of sundew grow the best in very warm and very humid places. The ideal temperature for sundews is from 70° to 80°.
In order to keep your plants humid, put your pots into a container that is deep enough that the sides come above the pots. Tightly wrap plastic wrap over the top of your container to seal in moisture. This will keep the humidity inside the container at a higher level than the ambient humidity in the room.
Sundew seeds vary in how long they take to germinate. Some species can begin to sprout in as little as 2 weeks, while others take much longer periods of consistent care to finally show themselves.
Once germinated, the first few leaves that grow may be non-carnivorous. This is simply because the seedlings haven’t built up the necessary energy to grow their normal carnivorous leaves just yet. Give them some time and they will start to grow before you know it.
Germinating Your Sundew Seeds – Cold Stratification
Temperate sundews require a period of cold stratification during germination to grow properly. This type of germination mimics the cold winter conditions the seeds would normally go through before spring arrives when growing in the wild. Cold stratification will take anywhere from 2-6 weeks to complete.
The longer you let your sundew seeds germinate in the cold, the better they will germinate. A month is the average period of cold stratification. While they are in the cold, you should keep an eye out for any mold if they are already in a pot.
There are a few different ways you can go about putting your seeds through cold stratification…
Placing Seeds in Pots in the Refrigerator:
- Prepare your pot the same way you would before with your desired potting material.
- Dampen the soil in the pot, but don’t soak it.
- Sprinkle your sundew seeds over the surface of the soil.
- Put your whole pot inside a large enough resealable bag.
- Place your pots in a container to help them stand in the fridge and keep from getting disturbed.
- Leave your pots in the refrigerator for however long you prefer for your cold stratification.
This method is the most likely to develop mold due to temperature, water, and the soil. Check your pots for mold as often as you can, and make sure you rinse your potting material before planting your seeds.
Placing Seeds in a Paper Towel:
- Dampen your paper towel.
- Put your seeds inside the paper towel, clumping them all together for the best results.
- Put your paper towel inside a resealable bag.
- Place the bag in the refrigerator for your desired length of time.
- Prepare your sundew pots once cold stratification has ended.
- Place your seeds in the pot, using tweezers may make it easier to get them off the paper towel.
Submerging Seeds in Water – Small Container:
- In a small cup or container, pour in a very small amount of distilled water.
- Mix your seeds into the water, submerging them as much as you can.
- Use plastic wrap to seal the container tightly.
- Place the container in the refrigerator for your desired period of cold stratification. Be sure they are in a place where they won’t be knocked over.
- Once the cold stratification has ended, prepare your pot with your potting material.
- Use an eyedropper or pipette to draw your seeds up from the water.
- Very carefully drop your seeds and water over the surface of the pot, holding the dropper as close to the surface as possible.
Submerging Seeds in Water – Microcentrifuge Tubes:
- Place your seeds inside a microcentrifuge tube.
- Add less than 1mm of water to the tube.
- Shake the tube to mix everything around.
- Place the tube in the refrigerator for the desired period of time. Make sure you know where they are. They are small!
- Once the cold stratification has ended, prepare your pot with your potting material.
- Use an eyedropper or pipette to draw your seeds up from the water.
- Very carefully drop your seeds and water over the surface of the pot, holding the dropper as close to the surface as possible.
If you prefer a natural method of cold stratification, you can place your potted seeds outside during the fall and allow them to germinate over the winter months. This is only recommended if you have mild winter conditions where you live, as most sundews cannot tolerate extremely cold temperatures.
Once you remove your sundew seeds from the cold, they can be grown in the same conditions as subtropical or tropical sundews. The seeds will begin to germinate within 3 weeks after cold stratification is complete. Being removed from the cold resembles the beginning of spring.
Hardening Your Sundew Seedlings
While completely optional, hardening your seedlings is a fantastic way to give them a better chance at being strong. The process can take a few weeks, but by going through it, you will have a much easier time of growing your sundews to adulthood.
Acclimating sundews to be able to grow with less humidity should be gradual. You don’t want to remove them from their humid environment all at once, or you risk damaging them. It’s best to start making holes in the plastic wrap covering them little by little over a few weeks so they can get used to less humid conditions in their own time.
Hardening sundew seedlings makes it so that they can be grown in the same conditions as fully grown sundews right from the start. It hardens their leaves against disease and protects them from fungus. Once you harden your seedlings, you can feed them larger portions of food so they can grow big and strong.
Feeding Your Sundews
Most sundews will begin to grow their carnivorous leaves within a month after they germinate. It’s recommended that you don’t start to feed them until they have at least 3 carnivorous leaves so that they are strong enough to eat it.
Sundew Feeding Options:
- Beta Fish Pellets
- Freeze-Dried Bloodworms
- Wingless Fruit Flies
- Gnats
- Ants
- Spiders
If you can catch smaller insects like gnats, ants, and spiders to feed your sundews, just make sure to kill them first. If they are still alive, there’s a chance they will escape the young sundew before they can be digested. For even better nutrition, use a variety of foods for a good, diverse diet.
When using fish food or bloodworms, it’s best to grind them up for your sundews so they can easily eat them.You also want to avoid feeding your sundew too much food at once, which can lead to mold forming on a leaf and destroying it. If you drop food into the soil, try to flush it away, so mold doesn’t grow there either.
The amount of food your feed any leaf on your seedlings and young plants should be no larger than the largest dew drops on that leaf. You can either feed them a single particle that is the size of the dew drop, or multiple particles that are smaller in size. Just make sure the smaller particles don’t add up to more than the size of the drop or you may overfeed it.
It is easiest with seedlings to use tweezers to pick up the food and place it on the leaf. You absolutely must put the food on the dew drop. If it doesn’t make contact with the dew drop, your sundew won’t be able to sense there is food there, and it could end up forming mold on the leaf.
Your sundew’s tentacles will start to curl around the food within an hour, for most species. It could take shorter or longer depending on what kind of sundew you are growing. They will continue to constrict around the food until they are tight, and the food cannot escape them.
As your seedlings grow, you can experiment with feeding them larger portions of food. This is especially true if you have hardened your seedlings. You have to be very careful to watch for mold growth if you increase their food and stop when you find out what their capacity is.
Food portions will naturally grow along with your seedling. As they get bigger, so will their dew drops, and thus the amount of food you give them. When your sundews get larger and reach maturity, it may be easier to feed your sundews by mixing their food with water, which makes it easier to avoid dropping particles into the soil.
How to Feed Your Sundews with Soup:
- Grind up the food of your choice into a fine powder.
- Mix the powdered food with water in a 1:1 ratio.
- Use an eyedropper or pipette to suck up your mixture.
- Use your dropper to drop your food mixture onto your sundew’s leaves.
- Remove any excess clumps of food with a tweezer or pipette.
- Stir the mixture before refilling the dropper each time to keep the powder from settling on the bottom.
- Add more water if necessary, to keep the food consistency right for drawing up into the dropper.
A good feeding schedule for sundews is every 1-2 months. This isn’t necessary, but it will promote growth the best. You should certainly feed your seedlings and young plants with more frequency so that they grow into strong adults. If you are low on time or resources, it’s possible for sundews to survive on feedings 2-3 times a year, but only after reaching maturity.
Growing Tuberous Sundews
As the name suggests, tuberous sundews are grown from tubers rather than seeds. These tubers average an inch or less in size and come in many different colors and shapes. Tuberous sundews are most naturally found in Australia. The harsh climate is the reason they have formed tubers.
These sundews survive within their tubers deep in the ground throughout the very hot, dry summer months.They grow mostly in sandy soil. Tuberous sundews begin sprouting at the beginning of the winter when conditions are cooler and wetter. Once the temperature rises again, they retreat into the soil to form new tubers.
Growing tuberous sundews is considered much more difficult than growing their subtropical and tropical counterparts. They need very specific soil and growing conditions and usually take much longer to germinate and grow.
If you’d like to take on the challenge of growing tuberous sundews, you can find a very in-depth guide that will walk you through the entire process here. It’s recommended that you start with a simpler species, but if you’re up for the task, go for it!
The Best Sundews for Beginners
Several species of sundews are better suited for anyone just starting out with the plants. If you want to grow them from scratch, rather than buy an already matured plant, you may be better off with one of these species.
Beginner Sundews:
- Drosera Natalensis
- Drosera Capensis
- Drosera Binata
- Drosera Takaiensis
- Drosera Spatulata
These sundews are the most commonly available and tend to be heartier. They can tolerate growing conditions that other sundews may not be able to thrive in. They can grow in lower light and are very adaptable, making them ideal for all sorts of growers.
There’s a Sundew for Everyone
Sundews are a remarkable plant that makes for a wonderful household companion. These carnivorous plants are perfect for anyone that experiences insect problems in their house. They’re also just really cool to look at! No matter what you like, there is bound to be a species of sundew (out of the 150+) that will catch your eye.
The timeline for growing sundews is pretty straightforward—
- Prepare your pots
- Sow your seeds
- Germinate!
- Harden the seedlings, if you want.
- Keep them fed
Sundews don’t need as much attention as other houseplants and will provide your home with an interesting point of conversation. You can easily go from a handful of seeds to a beautiful bug-eating plant within the span of a month if you play your cards right.
