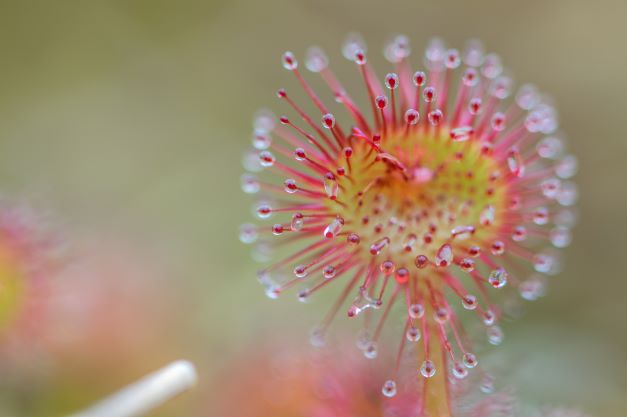
The sundew is an interesting and exotic carnivorous plant. Yes, that’s right, it feeds on any insect that was unfortunate enough to get too close to it. To plant and raise this plant it will take a bit of work and a lot of patience, and if you don’t know how to plant it, your exotic antifly plant won’t be able to thrive.
How to plant sundew seeds: When planting sundew seeds of any type, there are several parts of the process you will need to know to ensure that the seedlings reach maturity. They are:
- Set up an area to germinate and grow the sundew seeds
- Select and rinse the media you’re going to grow the seeds on
- Prepare the pots for the sundew
- Sow and feed the seeds
Planting sundew seeds can be an enjoyable experience for those who are into raising exotic plants. We’re going to take a step-by-step overview of the process and then get into all of the details you need to know to raise healthy carnivorous plants that will be around for years.
Step By Step Guide To Planting Sundew Seeds
Prior to actually planting your sundews, you are going to have to set up the area in which you will be planting (germinating) them. The process of growing a sundew from seed takes some time, but it will be worth it. How much time can really vary, depending on the seed:
- Some sundew seeds can germinate in as little as 1 to 6 weeks
- Others can reach full maturity in as short as three months
- Still others, like tuberous drosera, can take up to 3 years
So, you may need to have some patience! Now let’s talk about how to get the germination container set up:
Step 1: Prepare The Media You Plan To Use
The first thing you are going to need to do is rinse the media you are planning to use. This will prevent the media from having a buildup of mold and algae which can negatively impact your sundews.
Good choices of media include:
- sphagnum peat and silica sand
- long-fibered sphagnum
After rinsing, you will want to prepare and mix the media that will be used. Mix one-part sphagnum peat to one part silica sand, then place the media in the pot that you wish to use.
Remember that a plastic or glazed pot is going to be best to prevent the sundews from dying of mineral toxicity from a clay pot.
Step 2: Prepare The Pots For The Sundews
Smaller varieties of sundews should be placed in a 4-inch pot. While they can be placed in a 2-inch pot, this will save time in having to transplant them from one pot to the next after they are germinated.
Step 3: Sowing The Sundew Seeds
Unlike most plants, when it comes to planting sundews, you do not bury the seeds into the soil when you are planting them. You sprinkle them across the surface of the soil as if you are sprinkling salt on a dish. Cover the entire surface evenly. Here are some guidelines for planting the seeds:
- Do not bury your sundew seeds. If you bury them like you would any other seeds nothing will be able to grow. Remember to always keep the seeds on the surface.
- Spread the seeds a good distance apart from each other. Set them about 1 centimeter apart. This will give them a good bit of room to grow and also allow them to grow larger. If you have them clumped together, they will be competing with each other for nourishment.
- Clean your hands between planting multiple species. If you are planting multiple species of sundews in different pots, be sure to have all of the seeds off of your fingers before planting the next species to prevent mislabeling the sundews.
Step 4: Place The Sundew Pots In The Germination Set-Up
Place the pots in their germination set-up. Try to keep the set-up in a more humid area as higher humidity seems to have a positive effect of sundews and helps with their germination.
To give your germination set-up a boost you can invest in a humidifier or place the pots in a sterile container and wrap it in saran wrap to lock in the humidity.
You will then want to place the container in a warm and humid area to assist in the germination process and increase the germination success rate.
Things You Need To Know For Your Sundew Cultivation
Sundew is not a plant that you will cultivate like any other. If you have planted flowers or vegetables before, you are going to need to throw that experience out of the window.
In this section, you are going to learn more about the requirements of planting sundew and things that you need to avoid doing. Here’s what you need to know:
- You cannot grow sundew in normal potting soil! The higher nitrogen content is toxic to sundews and will kill the plant, leaving it unviable for cultivation. Peat moss or long-fibered sphagnum is what you should be looking to use.
- It is unnecessary to give your sundews fertilizer. They do not require it for their growth. If you decide to use fertilizer on your sundews, you must apply it weakly (extremely low amount)
- Give them lots of light. You can use supplemental lighting like specialized lightbulbs, but it is not necessary. Just be sure to keep them in a well-lit area.
Materials Needed For Cultivation
Below is a list of materials that you will need to acquire to cultivate your sundews. These items are very specific since you are unable to cultivate sundews as you would any normal plant and they also provide the best results:
Peat moss, or sphagnum peat moss
his is relatively easy to be found at any outdoor gardening store for the most part or on Amazon. When it is dry, the substance is black and powdery to the touch.
Cultivation Notes:
- You must rinse the moss. This is due to some brands being of lower quality than others. A lot of peat mosses tend to grow mold and algae. This is not an ideal cultivation environment for sundews.
- Do not inhale the peat dust. Chronic exposure to peat dust can cause some individuals to develop sporotrichosis from the fungal spores that are found in the peat. Due to these same complications, it is recommended that you wear gloves when handling in case you have cuts on your hands.
Long-Fibered Sphagnum Moss
This is a great media for sundew, and many of the sundew variations can thrive in this type of moss, depending on your climate and the area designated for growing. It is considered to be an excellent substitute for peat moss and can be found at most gardening stores or you can get it here.
Cultivation Note:
- Some recommended brands of long-fibered sphagnum moss are I Better Grow Orchid Moss and Mosser Lee. Where this type of moss is concerned, it is much faster and cleaner to use than your normal peat moss. But you still need to rinse it.
Silica Sand
This can be located at your local pool supply stores as pool filter sand or your can buy it here. Pool filter sand is typically pre-washed, so it cuts down some of your rinsing time. A larger grade of #20 is recommended and is good for loosening up the soil in your sundew pots, allowing them to drain better. Give it a rinse before using it to avoid mineral buildup.
Cultivation Note:
- Do not inhale silica sand dust: With repeated exposure to silica sand dust, you can develop the lung condition silicosis.
Plastic or Glazed Pots
When cultivating sundew variants that have long roots, you will want a pot that is between 4 to 6 inches. If you are cultivating South African Sundews, then the 6-inch pot is going to be your best option. Clay pots can be used, but they run the risk of releasing minerals that can potentially kill your sundews over time.
Cultivation Note:
- If you decide to use clay pots even though they can release minerals that are deadly to sundews over time, make sure that you topwater the plants in this type of pot. That will help to flush away the minerals that are deadly to the sundews and help keep them alive longer.
Grow Lights
As mentioned before, sundews require a lot of light to grow and thrive properly. If you don’t have enough lighting in the area available to them. Investing in some grow lights may be a good option for you. They don’t have to be plant and aquarium bulbs either. Normal fluorescent lights will work fine and mix cool and warm bulbs to cover the entire spectrum.
Cultivation Note:
- The best practice for placing a sundew within the light is to have them as close to the light as possible without putting the sundews at risk of burning from the heat. You want to keep them about 2 inches from the light to give it maximum lighting and keeping it safe from burning at the same time.
The Proper Temperature Range For Increase Germination Success Rate
Temperature and humidity have to be right to get sundew seeds to germinate. The proper temperature and humidity will vary according to the type of sundew you are planting.
Cultivating Tropical and Subtropical Sundew Seeds
These varieties the highest rates of cultivation when in warm and humid environments. A temperature range of 75 to 80 degrees Fahrenheit (23 – 27 degrees Celsius) is ideal with humidity as well to provide the best type of environment they will need to thrive.
If your environment tends to get colder at certain times of the year, try making sure that there is a small heat mat under the germination environment. This, with synchronized lighting, will ensure increased sundew germination.
However, it should also be noted that a nighttime drop in temperature 58 degrees Fahrenheit (14 degrees Celsius) can be beneficial to the sundew seeds’ germination process and is healthy for the subtropical sundew seeds. Where it concerns tropical sundews, however, they will thrive best in an environment that also has high humidity but maintains a temperature range of 85 to 90 degrees Fahrenheit (29 – 32 degrees Celsius).
What To Do Once The Sundew Seeds Have Germinated
The germination of sundew seeds can vary dramatically in the amount of time they need to germinate. It can typically take anywhere from a week to 2 months or longer for germination to have taken place. This time frame will also be affected by how fresh the sundew seeds are.
The tuberous species of sundews are notorious for taking a long time to germinate, sometimes needing up to three years of continuous seasonal cycling before they begin to germinate. If you happen to be dealing with this type of sundew, be sure to constantly pay attention to it and care for the seeds as they will take a lot of patience and proper care through the season cycles to achieve germination.
When the sundew seeds have actually germinated, you will see little sprouts coming out of the soil, similar to tiny leaves. This is why it was important to rinse the peat moss prior to use. While the algae and mold itself are not dangerous to the sundew plants, they can eventually overtake them, if the media isn’t rinsed properly.
How To Raise The Sundew Seedlings To Maturity
Soon after sundew seeds have germinated, they will begin to develop their carnivorous leaves and begin their long and slow process of becoming adult sundews. You might then need to know how to take care of a sundew correctly.
Cultivation Note:
- It is important to note that all sundews are not carnivorous. Or at least they don’t remain so. The cotyledons are a good example of these non-carnivorous sundews. They may develop a few of these carnivorous leaves (around 3 or 4). Their first true leaves will have carnivorous traps if the conditions are right.
- Also, if they do not get exposed to enough lighting these leaves will not become fully developed. Due to this, the first 4 leaves may not be carnivorous until they can get enough energy from the lighting to develop these leaves.
Hardening the Seedlings
When the sundew seedlings have reached a large enough size, it is widely recommended that you begin a process called “hardening” of the seedlings. This is to ensure that they will be able to grow and survive in a less humid environment. You will have to gradually lower the humidity to “harden” them to the conditions of being in a less humid environment.
Cultivation Note:
- Take care to not lower the humidity in the seedlings’ environment too quickly. If you drop the humidity levels in their environment too quickly you can cause harm to the sundew seedlings and decrease their chances of survival into adulthood. If you used saran wrap instead of a humidifier, you can gradually put holes into the saran wrap covering over the course of a few weeks.
If the humidity level in your trays are already at the ideal level that you need (40%), you can bypass the entire hardening process and begin to move them directly to their new trays.
Why Do I Need To “Harden” My Sundew Seedlings?
Hardening your sundew seedlings to survive in a less humid environment because it helps increase their lifespan. Without hardening your sundew seedlings your sundews’ leaves will not be as durable and will have a greatly increased susceptibility to fungus and disease.
After your seedlings are hardened-off, they will be able to grow and live the same type of environment and conditions as an adult sundew of the same species. Another benefit of hardening your seedlings is that they will be able to be fed and consume larger amounts of food than a seedling that has not been hardened. This will help them reach maturity significantly faster.
Cultivation Note:
- It should be noted that hardening your seedlings is not required. There are a lot of individuals who have seen great success in the cultivation of their sundews without ever hardening the plants even in adulthood. With this in mind, hardening is still widely recommended by experts.
- Note that hardening your seedlings may develop mold. Due to this risk, you won’t be able to feed the sundews as much food as you (and they) would like and you have to constantly monitor for potential mold growth. Due to the lower feeding amounts, they will take a bit longer to reach maturity than their hardened counterparts.
What If I Planted My Sundew Seeds in A Small Pot Instead of A Larger One?
If you elected to plant your sundew seeds in a smaller 2-inch pot, you will need to transfer them to a larger 3 to 4-inch pot after they have sprouted.
If for some reason you cannot or don’t want to do it then, you can wait until they have reached maturity to transfer them to their new pot. There are of species of sundews that can survive and thrive in the smaller pots, however.
When you decide to move your young sundew seedlings from one pot to another you need to very careful to not disturb their roots or leaves and to move them with a toothpick or tweezers. Disturbing or damaging the leaves and roots of a sundew seedling can spell disaster for them and will potentially kill them or set back their development.
Cultivation Note:
- There are some species of sundew like D. burmannii that successfully germinate when floating or submerged in water with dim lighting conditions. If you decide to cultivate this sundew as an option, once the seed has germinated, you can remove it (carefully) from its watery habitat and place it onto the selected media.
How Do I Help My Sundew Seedlings Reach Maturity Faster?
No one likes to wait too long for anything, that includes waiting for sundew seedlings to reach their mature state. When your seedlings have developed their carnivorous leaves, (which will be anywhere from a few weeks to a month after germination) you can boost their growth by feeding them small amounts of food.
It is really up to you, but in reality, you can begin feeding your sundew seedling once it has grown its first carnivorous leaf. However, keep in mind that it is recommended to wait until it has 3 or 4 carnivorous leaves. This is to ensure safe practices in case the leaf starts to develop mold on it from feeding.
Cultivation Note:
- There a few options that you can resort to when it comes to feeding your sundews. One option is Beta fish food pellets. A lot of other sundew growers like to use tweezers to tear apart small insects and freeze-dried bloodworms to feed their sundew seedlings. This is largely going to depend upon you and what you want to provide to your sundew as nourishment.
How Do I Prepare the Food For The Sundew Seedlings?
If feeding the sundew seedlings Beta fish food pellets, you will need to crush the pellets into a powder. Here is how you do it:
- Use a rolling pin or a heavy object to break it down to the appropriate size.
- To feed the seedlings, you will need a pair of tweezers to very carefully pick up the food.
- Using the tweezers, very gently rub the food onto one of the seedling’s dew droplets on the tentacles on its carnivorous leaves.
- If the food is not on the dew, the sundew will not sense that it is there and will not consume it. This will lead to the development of mold.
As your seedlings continue to grow you can continue to feed them food that is the same size as the dew droplets on their carnivorous leaves. As the sundew continues to grow, the droplets will become larger, leading them to be able to eat larger portions of food.
Cultivation Note:
- If you are able to monitor the seedlings for mold, you can begin to experiment to see how much food they can actually handle by placing larger amounts on the dew. Only do this if you can monitor for mold growth on the sundew’s leaves.
Can I Expect to See A Difference in My Seedlings After Feeding Them?
After you feed your sundew seedlings you will not see a difference in their size. Not immediately anyway. You will need to wait about 2 weeks after feeding them to see a noticeable difference in their size.
However, after feeding them, you will notice that their leaves are no longer curled. You may also begin to notice that they are also beginning to develop new leaf bubs forming towards the crown of the seedlings as well.
It is recommended to feed seedlings every two weeks or less if they don’t receive much light to achieve the best growth and development. If this schedule is maintained and adhered to, your sundews will begin to flower within 4 months or less.
Cultivation Note:
- If your sundew only has three leaves, it is recommended that you feed the leaves one at a time to prevent the potential development of mold. If you are able to monitor for mold you can feed more than one, but you will be attentive to ensure the food is being broken down by the seedling.
Any Special Tips I Can Use in Cultivating My Sundews?
Of course, there are! Here a few tips and things to consider when you begin cultivating sundews:
- Watering: Most sundews will thrive on the water tray method which keeps the soil/ media permanently wet. There are a few, however, that can actually float in water or be submerged and thrive,
- Temperature: Sundews don’t only grow in tropical and subtropical environments. There are able to be found all over the world. That said, some sundews will thrive when it gets colder out, while others will become dormant during the winter months.
- Dormant Periods: Subtropical/ Tropical sundews function opposite of each other. When it gets cold, sundews from warmer climates will begin to lose their leaves and curl up. At the same time that is happening, winter sundews are becoming more active. When it is summertime, winter sundews will become dormant and lose their carnivorous leaves as well.
- Feeding: If you are an individual that wants to grow their sundews outside, feeding them is not going to be a concern as they will catch their own food. Still, monitor for mold growth though.
- Fertilizing: Fertilizer is not necessary for the growth of sundews. If you choose to fertilize your sundew plants, MaxSea fertilizer is recommended in a very small, diluted amount. ¼ tablespoon to 1 gallon of water. Avoid pouring through the soil.
In Conclusion
Thank you for your time in reading this guide and I hope that it was very useful for you! If you are looking for more information on sundews and feeding them check out this website for lots of great information on the subject of sundews. Thanks again and have fun with that carnivorous plant of yours!
