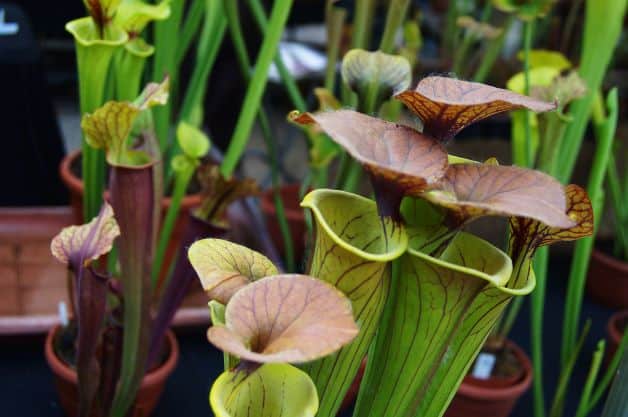
Pitcher plants are carnivorous plant species native to North America. They are easy plants for beginning gardeners growing indoors; however, there is a bit more to keep in mind when growing them outside. They must be watered more often than one might think, with well-draining soil.
Why might your pitcher plant be drying up? Some reasons your pitcher plant may be drying up, considering its needs for care:
- You aren’t watering it enough.
- The humidity level is wrong.
- The temperature isn’t quite right.
- Inappropriate soil compostion.
- Inappropriate container choice.
- The plant is going into dormancy.
Tom’s Carnivores explains that pitcher plants, like many other carnivorous plants, evolved to draw minerals from their prey instead of directly from the water. This is why tap water and filtered water must be avoided, as the plant can easily be overloaded with minerals. Here, we’ll outline more reasons as to why your pitcher plant may not be doing well with its current watering schedule.
Pitcher plants are generally low-maintenance plants. To clarify, these plants are low-maintenance after their specific environmental needs are met. In order to create the perfect home for your pitcher plant, there are some important things to know about what may cause your plant to dry up.
Reason #1: You Aren’t Watering it Enough
So, how often do you water a pitcher plant? Pitcher plants are native to bogs, which are marsh- and swamp-like habitats. Their soil needs to be kept damp at all times; however, they are sensitive to the chemicals in tap water and even filtered water.
Tom’s Carnivores suggests watering carnivorous plants by using a watering tray that sits beneath the plant’s container. This allows the plant to take up water when necessary, avoiding the risk of flooding the container.
Instead of setting a regular watering schedule – running the risk of forgetting to water at some point – Carnivorous Plant Nursery provides a structured regimen based on observation of your plant watering tray:
- Set the plant container in a tray
- Fill the tray with distilled, purified or rainwater to between ¼ inch to half the depth of the pot
- Observe the water level in the tray and refill when the level falls below ¼ inch.
It is also suggested to water the pitcher plant from below, directly into the tray, rather than from the top, into the soil. This will prevent you from inadvertently rinsing off necessary excretions that the plant needs to trap its prey.
Additional practices for watering your pitcher plant include:
- Check the dampness with your fingers by touching the soil. If the surface of the soil feels dry, you are free to water the plant.
- If you are not using a watering tray, you can avoid overwatering and flooding the container by ceasing to pour when you see water coming through the drainage holes. The container should then be allowed to completely drain to achieve the perfect concentration of water in the soil.
- Despite these plants needing a great deal of water, you must be careful to avoid waterlogging the roots. This will cause root rot and effectively drown the plant.
Can I Use Tap Water?
It is vital that you do not use tap water in caring for your pitcher plant. Carnivorous Plant Nursery suggests the following sources for suitable water for your pitcher plant:
- Rain
- Grocery store for distilled water
- Condensation line of an air conditioner or heat pump
- Reverse-osmosis water
Carnivorous plants naturally grow in nutrient-poor soil, and therefore any minerals found in tap or even bottled water would overwhelm the plant and cause its health to deteriorate.
If you have no other option than to use tap water, make sure to follow it up as soon as possible with any of the recommended sources listed above.
Reason # 2: Humidity Level is Wrong
Another aspect of the marsh that is vital to the pitcher plant’s health is humidity.
Gardening Know How suggests a humidity level of around 60%. This is why, as we mentioned earlier, it may be easier for plant owners to grow their pitcher plants indoors rather than outdoors.
Keeping the pitcher plant in a terrarium will greatly help you in controlling humidity levels. However, if using this method, do not seal the terrarium, as the warm, humid environment creates a habitable environment for potentially dangerous fungi and bacteria.
You can also place a humidifier next to the pitcher plant’s container.
Some non-techy, DIY ways of keeping your pitcher plant humidity-happy are:
- Create a small “tent” around the plant with plastic wrap. That way, whatever water vapor and heat the plant is giving off will be trapped in the “tent” and the plant is providing its own humidity.
- Making a bottle terrarium to set around your pitcher plant. These work in the same way as the plastic wrap tent.
If humidity levels are too low, the plant will stop producing the pitcher structure and only produce leaves. As the pitchers are its method of capturing prey, this will ultimately lead to a decline in health, and possibly death.
Lastly, you must ensure that any structure you decide to use to maintain humidity levels for your pitcher plant allows airflow. This will prevent the plant from having to endure stagnant air and potential overheating.
Reason #3: The Temperature Isn’t Quite Right
Pitcher plants can thrive in a wide range of temperatures, and as all gardeners know, the temperature has a direct influence on water retention in the soil.
Considering both day and night temperatures, most pitcher plants do best in temperatures between 55-95˚F. Highland species prefer night temperatures of 55-60˚F and days at 70-85˚F. A few example species are:
- Nepenthes burbidgae
- N. lowii
- N. villosa
Those from lowland habitats, such as N. alata, N. eymae, N. khasiana, and more prefer warmer climates and are thus easier to grow.
This is yet another reason why it is easier to grow Nepenthes pitcher plants indoors, as it is much easier to control their ambient temperatures in a controlled environment.
These plants enjoy ample sunlight, but too direct, and too long of exposure could lead to the soil drying out, and again, an unhealthy pitcher plant.
If you would like to grow your pitcher plant outdoors, simply make sure that it is nestled underneath a taller plant, so that it is not exposed to full sun throughout the day. The shade of the plant above it will create a suitable microclimate for the pitcher plant and allow it to thrive even outside a controlled environment.
Partial sun is best for these plants, however, that they can also be grown under 12-14 hours of daily artificial light. Fluorescent lights are preferred for this method.
The Best Hardiness Zones for Pitcher Plants
Out of the three genera of pitcher plants, Sarracenia, Nepenthes, and Darlingtonia, Sarracenia is the most adaptable, as it can tolerate zones 2-9. Nepthenes would be best kept indoors, as it is adapted to more tropical environments, and so has more specific needs.
Being native to northern California and southern Oregon, some Darlingtonia species will be much more difficult to grow.
Reason #4: Inappropriate Soil Composition
Choosing the right soil composition will also directly dictate the efficiency with which moisture will be retained. If you are choosing to grow outdoors, checking your USDA Hardiness Zone to know whether or not your plant will thrive in your area.
It also helps to know where your particular species is native to, as this will help you decide on the soil composition and whether or not it’s safe to grow outdoors.
Remember that pitcher plants are native to areas that typically have nutrient-poor soil. Peat and sand make up the majority of the composite of this soil, so you will want to replicate that as best you can.
The best way to do this is by mixing sphagnum peat moss, perlite, vermiculite, and either horticultural or sandbox sand. Whatever you do, stay away from “contractor’s sand!”
The composition of “contractor’s sand” will not work well for your plant, as it contains silt, clay and is highly concentrated in other minerals. This composition will not only overwhelm your pitcher plant in minerals but will also provide little ventilation to the roots and effectively suffocate the plant once it is weighted down by the water.
Additionally, never use beach sand or sand, which is limestone-based, as, again, the mineral content is much too high for your pitcher plant to endure. This is the same reason why you must avoid fertilizing as well. Avoid standard gardening soil as well!
For the soil mixes, you can generally use a 1:1 mixture. Be conscious of the fact that too much aeration in the soil (e.g., more peat moss than sand) will lead to far too much drainage and, ultimately, no water retention.
Reason #5: Choice of Container
The container is a key part of plant care, as it can cause overheating of the root system, strangulation of the plant if it is too small, absorb moisture from the soil, and other harms.
Many recommend plastic or ceramic containers for carnivorous plants.
Avoid terracotta containers, as they are a very porous material and will absorb moisture from the soil, drying out your plant. They can also leak salts into the soil over time, negatively impacting your plant’s health.
If the container does not already have drainage holes, drill them into the bottom of the plastic planter. Ceramic pots should already have one hole in the center of the bottom of the container.
If you prefer to grow your pitcher plant outdoors, simply make sure that the soil is slightly acidic, not too compact, and that your plant has shade for at least half the day. It is advised that you avoid planting your pitcher plant directly into the ground, given their very specific needs, even if you’re planting them outdoors.
An Alternative to Containers for Pitcher Plants
The final alternative is planting them directly into the water. They can be grown in shallow ponds or fountains, as long as their pitchers are kept above the surface.
Bog gardens are a great example of this practice, and they’re quite easy to construct:
- Dig the desired shape of your bog about 12-14 inches deep. Try not to make the edges too sloped. You’ll want them to be nearly vertical.
- Line the bottom with hardware cloth or similar material for protection against underground critters.
- On top of this, provide a water-resistant layer, such as a tarp or plastic sheet. Cut a few small holes or slits into this layer, so the bog can drain and does not become waterlogged, ultimately drowning your plant.
- Fill the bottom 3 inches of the basin with sand and follow that with a 1:3 mixture of sand and peat moss. (You will want the mixture to be moist before application.)
For bog gardens, it’s recommended to use drip irrigation or soaker hoses underneath the basin to maintain moisture. With this outdoor setup, moisture will be less of a concern, and you will need to pay extra attention to what types of decorative rocks or structures you use around the basin, as they can leach unwanted minerals into the bog.
How to Re-Pot Your Pitcher Plant
It’s important to know that pitcher plants must be handled with extreme care, which makes them a bit difficult to pot. This is because their root systems are very fine and can easily be damaged when being transferred into a new container.
Often times, in nurseries or garden sections of home stores such as Home Depot, exotic plants, if not sold in ceramic containers, are arranged in terracotta planters or containers with no drainage holes. If ordered online, they will likely be shipped with the root system bare.
With what you know now, you will need to solve this problem upon bringing your new plant home:
Potting Your Pitcher Plant
- Cover the bottom of the container with sphagnum moss.
- Fill the container with your sand and perlite/vermiculite mixture, while integrating the sphagnum moss throughout the process.
- Mix up the soil with your fingers to ensure aeration.
- Create an indentation where you intend to plant the pitcher plant.
- Gently separate the roots of the pitcher plant to give the root system as much surface area as possible.
- Insert the pitcher plant into the soil and surround the base of the plant with soil mixture.
- Gently pack down the soil so that it allows the plant to sit upright, but not too much as to eliminate aeration.
- Thoroughly water the plant, and make sure to observe the drainage.
Make sure that the container is the proper size depending on the age and species of your plant. If the container is too small, as the plant grows, the root system will be constricted, “choking” and killing the plant as it is unable to grow healthily. Root-bound plants are known to develop a similar appearance to those that have dried out: browning leaves, wilting, etc.
Reason #6: It’s Going Into Dormancy
Remember that your carnivorous plant has a dormancy period during the winter season. This physiological mechanismis triggered by lower evening temperatures and shorter days. So, have no fear! It may not have shriveled up and died. It may just be in a dormant state.
The plant will have a similar appearance to one that has died: the tips of the pitchers will begin to dry up and turn brown; the drying will then work its way down the tube of the pitcher, and this portion will eventually fall off the plant.
Your telltale sign of whether or not your plant has died is that the lower third of the pitcher will remain green throughout the dormancy, as it is continuously feeding on the previous season’s catch to survive through the harsh winter.
You can help your plant through this time by
- Applying a generous serving of mulch around the base of the stem. This will help to insulate the soil and maintain steady temperatures.
- Bringing your pitcher plant indoors, in a cool, enclosed area.
- Decrease the frequency with which you water the plant during dormancy as well. You will need to continue providing proper ventilation and humidity during this time.
For outdoor plants, if you do not want to bring them in, you can cover them with a tarp after mulching. You may remove the tarp at the beginning of spring.
